
Apple Vision Pro can now put you inside an iRacing cockpit with your real hands on your real wheel, but the way it works, and the way you get it running well, is not what most people assume. This guide covers both halves of the decision: whether iRacing on Apple Vision Pro is right for your setup, and exactly how to install, configure, and optimize it once you commit.
We’ll keep it honest. Some of what’s been written since launch reads like a highlight reel. Sim racers deserve the real picture: requirements, trade-offs, the settings that actually matter, and the gotchas that trip people up on day one.
Part 1: Is iRacing on Apple Vision Pro right for you?
What it actually is: streaming, not a native app
The most important thing to understand before spending a cent: iRacing does not run on the Vision Pro. The simulation, the physics, and the rendering all happen on a Windows PC with an NVIDIA GPU. A free visionOS app called iRacing Connect receives a video stream of that render over your local Wi-Fi, using NVIDIA CloudXR. The headset is a premium wireless display and tracker, not the machine doing the work.
Despite the “Cloud” in CloudXR, nothing leaves your house. You are streaming from your own PC sitting a few feet away. That architecture is what makes the experience possible, and it’s also the source of every requirement and limitation below.
The genuine differentiator: your real wheel, in the virtual cockpit
Here’s what makes this more than “iRacing in a headset.” Using the Vision Pro’s passthrough cameras, iRacing Connect blends your physical environment into the virtual cockpit. It masks the digital car interior so you see your actual arms, hands, and steering wheel in real time, precisely where they are.
Anyone who has raced in conventional PC VR knows the frustration: reaching for a wheel button you can’t see, learning your rig by feel, occasionally fumbling a shifter. This addresses that directly. The headset even tracks your wheel and auto-aligns the cockpit position, so you skip the manual recentering that other VR setups require. That mixed-reality integration is the real reason to be interested. It is something cheaper VR streaming workarounds don’t replicate.
What you need before you start
This is where a lot of the launch excitement collides with reality. Every layer has a threshold, and the networking requirements are the ones most people underestimate.
- Apple Vision Pro running visionOS 26.4 or later, with the free iRacing Connect app.
- A capable Windows PC meeting iRacing’s “high-end” specification, with an NVIDIA RTX 4070 Ti / 5070 Ti or better and driver 580 or newer.
- An active iRacing subscription. The Connect app is free; iRacing itself is not.
- A serious network. A Wi-Fi 6 (or newer) router capable of sustaining 1,000 Mbps on the 5 GHz band, which is the fastest band the Vision Pro can use. Standard ISP-supplied routers are generally not enough for high-bitrate VR streaming.
- A wired PC. Connect your PC to the router by wired Ethernet, Gigabit or faster. Gigabit clears the streaming requirement with room to spare, and plenty of high-end boards now ship with 2.5 GbE or 10 GbE, which does no harm. Running both the PC and headset over Wi-Fi doubles the load on your wireless spectrum and invites latency spikes.
- An adjustable rig. Because you’ll see your real hands, your physical seating position needs to roughly match the virtual driver’s. The closer the alignment, the more convincing it feels.
Who it’s for, and who should wait
It’s for you if you already own a Vision Pro, have a high-end NVIDIA rig and a real wheel-and-pedal setup, and you’re willing to treat your home network as part of the sim rig. For that person, the mixed-reality cockpit is a genuine step forward.
Consider waiting if you’d be buying a Vision Pro primarily for this, or if your network is whatever your ISP shipped you. This launch was built for existing, committed sim racers, not as an easy on-ramp for newcomers. And a few things remain unproven at the time of writing: independent, full-length-race reviews of latency, sustained image quality, battery life, and long-session comfort are still thin. Go in with clear eyes.
Part 2: Setup and optimization
Step-by-step: getting connected
- Update and install. Make sure your Vision Pro is on visionOS 26.4+, then download iRacing Connect from the visionOS App Store.
- Set the display mode on your PC. Launch the iRacing UI on Windows. In the upper-right display-mode dropdown, select CloudXR.
- Join a session. Pick your session or race and click Join to launch the sim.
- Pair the headset. Open iRacing Connect on the Vision Pro and follow the prompts to connect to your PC on the local network.
- Navigate. Once connected, you interact with the iRacing interface through the desktop mirror window, as usual.
If the headset can’t discover your PC, or the sim won’t launch in CloudXR mode, start with one diagnostic that saves a lot of guessing: try a manual connection by your PC’s IP address, which iRacing Connect also supports. If the manual connection works but “Automatically Connect” does not, the fault is discovery, not connectivity: the stream (unicast on port 55000) is fine, and the automatic announcement is being dropped somewhere between the PC and the headset. From there it is almost always one of the three below, in rough order of how often it is the cause. iRacing’s quick start and troubleshooting guide documents the first two.
- Set your network profile to Private. In Windows: Settings, then Network & Internet, then Wi-Fi, then your network, and change the profile from Public to Private. A Public profile silently blocks the headset’s discovery requests.
- Allow the apps and port through Windows Firewall. Ensure inbound rules exist and are allowed for iRacingUI and cloudxrservice, and that port 55000 (TCP and UDP) is open. Also confirm you haven’t enabled “Block all incoming connections.”
- Check your access point’s multicast handling. Auto-discovery relies on local multicast (mDNS or Bonjour style) reaching the wireless headset from your wired PC, and many high-end, managed, or mesh Wi-Fi systems filter that traffic by default. That silently kills discovery while a manual connection keeps working, which is exactly the symptom above. Look for a per-SSID Multicast Filtering option: an Auto setting often counts as on, and it is a common default on a newly created SSID. Set it to Off on the SSID the headset uses. If your gear labels it differently, the equivalents are IGMP snooping, or a multicast-to-unicast or multicast-enhancement toggle. After changing it, relaunch iRacing Connect, and if it still does not appear, toggle the headset’s Wi-Fi off and on to force a fresh discovery query. If you would rather not touch the network gear at all, connecting by manual IP is a perfectly good permanent workaround.
The three layers, and which one follows your eyes
Optimizing iRacing on Apple Vision Pro means understanding that “performance” lives in three separate places. Tuning the wrong one wastes your time, and one of the three is the part people most often get backwards.
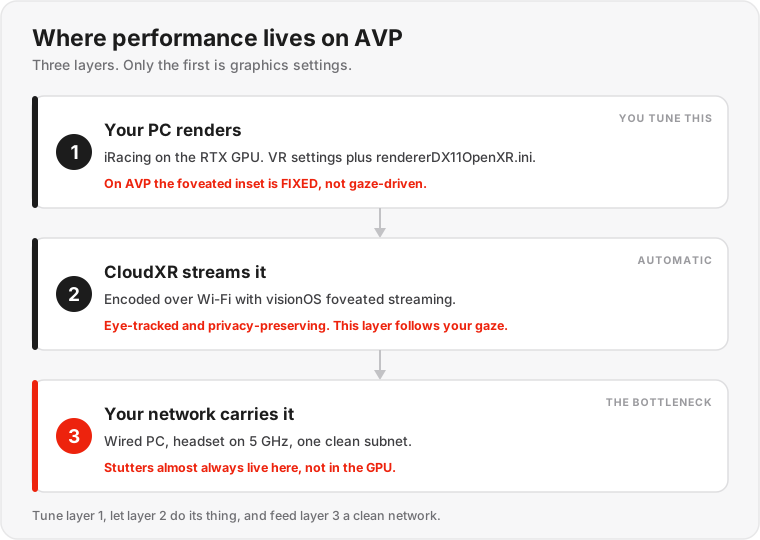
1. What your PC renders (you control this). iRacing’s VR graphics settings, and on disk the rendererDX11OpenXR.ini file in your Documents\iRacing folder, decide what the GPU actually draws: render resolution, detail levels, shadows, mirrors, and iRacing’s own foveated rendering. This is the layer with the most knobs, and the next section breaks it down.
2. How the frames are streamed (automatic, and this is the eye-tracked part). CloudXR and visionOS 26.4 encode and transport the render, using OS-level foveated streaming. This is the layer that follows your gaze: the Vision Pro reports the approximate area you are looking at, and CloudXR concentrates bitrate there. Two things are worth knowing. It is dynamic and eye-tracked, and per NVIDIA it is privacy-preserving, so your raw gaze never reaches the sim. You do not tune this layer; you just need the network to feed it.
3. Your network (the usual real bottleneck). If you get stutters, choppiness, or latency, the odds overwhelmingly favor the network over your GPU or headset. More on this below.
The common mistake is assuming iRacing’s own in-sim foveated rendering follows your eyes. On Apple Vision Pro it does not. The gaze-following lives in layer 2, the stream. Layer 1 is a fixed pattern, and the next two sections explain why that matters for how you set it.
The renderer file, and the settings that matter
New to VR in iRacing? Here is the part the launch coverage skips. iRacing does not keep one graphics configuration. It keeps a separate renderer file per output device, and the one that drives your Vision Pro sessions is rendererDX11OpenXR.ini, in your Documents\iRacing folder. (The companion frametime guide covers a trap this creates: it is easy to spend an evening tuning the wrong file. Read that before you hand-edit anything.)
Two rules before you touch it:
- Prefer the in-sim menu. Most of these map to options under Settings, then Display, then VR. iRacing rewrites this file whenever you change settings in the sim, so in-sim edits are the safe path.
- Hand-edit only with the sim closed. Edit the file while iRacing is running and your changes get overwritten the next time it saves.
The table below is a real, tuned configuration from a high-end rig (a 24 GB-VRAM class GPU). Read it as a reference and a sense of direction, not a copy-paste target. Your GPU, your headroom, your call. The values that scale with hardware are called out.
| Setting | What it does | This config | Notes and how to tune |
|---|---|---|---|
VRMode | In-sim foveated rendering mode (0 normal, 1 single-pass stereo, 2 NVIDIA foveated quad view) | 2 | The main VR performance lever. Set it under Settings, Display, VR, VR Mode. |
FoveatedInsetWidthPct | Size of the full-res central inset, 25 to 50 percent | 45 | Bigger means a larger sharp area and more GPU cost. On AVP the inset is fixed, so bias it larger (see below). |
FoveatedOuterPctRes | Resolution of the periphery, 25 to 50 percent | 35 | Lower means more performance and softer edges. |
AllowEyeTracking | Gaze-driven dynamic foveation, if the headset exposes gaze to the sim | 1 | On AVP this is effectively inert; the stream does the eye tracking. Harmless to leave on. |
ShowEyeTracking | Debug overlay for eye tracking | 0 | Set to 1 briefly to check whether the sim is receiving gaze, then set it back to 0. |
DepthLayerExtensionEnabled | XR depth extension, improves reprojection | 1 | Leave on where available. |
NvReflexMode | Low sim-to-render latency (NVIDIA Reflex) | 1 | Leave on. The frametime guide covers the full latency stack. |
LimitFrameRate / DesiredFPSLimit | In-sim frame cap (applies on external power) | 1 / 120 | Cap strategy is covered in the frametime guide. |
VerticalSync | In-sim VSync | 0 | Keep VSync out of the sim. See the frametime sync-stack section. |
VidMemToUseMB / SysMemToUseMB | Memory iRacing may use for textures | 24576 / 32768 | Hardware-dependent. These are 24 GB-VRAM and 32 GB values. Scale to your rig; more resident memory means less texture-streaming stutter. iRacing honors a hand-set value (auto-detect can under-allocate); edit with the sim closed and re-check after any in-sim change. |
TwoStageAA | Re-run anti-aliasing after the UI draws | 1 | A small quality win that costs VRAM. |
UIScreenDistCM / UIScreenWidthCM | Where the UI panels float in 3D space | 70 / 130 | Comfort and readability. Adjust to taste. |
The settings that spike frametimes in traffic (dynamic car shadows, cockpit mirrors, cars drawn, the sync stack) are not VR-specific, and they are where most of the real consistency work happens. Rather than repeat it here, the companion frametime consistency guide covers that in depth. This config already reflects it: dynamic car shadows off, cockpit mirrors off in favor of virtual mirrors, car counts capped, dynamic reflections off.
Foveated rendering: the single biggest lever, and how it really works on AVP
If you change one thing in layer 1, change this. Foveated rendering is off by default in iRacing, and iRacing recommends turning it on for any VR headset. It renders full detail in a central inset and drops resolution in the periphery, where you notice it least, which frees up significant GPU performance. In this config it is VRMode=2 (NVIDIA foveated quad view), set in the sim under Settings, then Display, then VR, then VR Mode.
Two settings size the effect:
FoveatedInsetWidthPctis the size of the sharp central inset (25 to 50 percent). Bigger means a larger crisp area and more GPU cost.FoveatedOuterPctResis the resolution of the periphery (25 to 50 percent). Lower means more performance and softer edges.
Now the part that is specific to Apple Vision Pro, and that is not stated plainly anywhere official. iRacing can do dynamic foveation, where the sharp inset follows your eyes, but only when the headset exposes gaze to the sim through the OpenXR extension XR_EXT_eye_gaze_interaction. That is what the AllowEyeTracking setting is for. NVIDIA’s CloudXR documentation describes the Apple Vision Pro integration as privacy-preserving: the headset reports only the approximate focus area, at the streaming layer, and does not hand raw gaze to the application. Apple Vision Pro is also absent from the list of headsets that expose that extension.
The practical upshot, separated into what is verified and what is inferred:
- Verified: the eye-tracked, gaze-following behavior on AVP happens in the stream (layer 2), and the gaze data stays protected.
- Inference: iRacing’s own in-sim foveated inset is therefore effectively fixed on AVP, centered, not following your eyes.
AllowEyeTracking=1is harmless but most likely inert here. - Verify it on your own rig: set
ShowEyeTracking=1in the[OpenXR]section, drive briefly, and watch whether the sharp region tracks your gaze. Then set it back to 0. That is the honest way to know, rather than trusting anyone’s claim, this guide included.
One consequence is worth acting on. Because the in-sim inset does not follow your eyes on AVP, bias FoveatedInsetWidthPct a little larger than you would on a headset with working in-sim eye tracking, so the fixed sharp region reliably covers where your eyes actually roam. Make one change at a time and test.
The frame rate ceiling is the headset, not your GPU
Here is a detail that catches people on day one: no matter how high you push iRacing’s frame rate on the PC, what you actually see is capped by the headset. On Apple Vision Pro your effective frame rate is set by the display’s refresh rate and the stream, not by how many frames the GPU can produce. Which refresh actually engages is chosen by visionOS and CloudXR, not by any setting inside iRacing, which is why nothing you change on the PC moves it.
The numbers, from Apple’s own specs:
- The Vision Pro displays support 90, 96, 100, and, on the M5 model, 120 Hz. The original M2 model tops out at 100 Hz.
- The default most people run into is around 90, so if you ever saw a hard ceiling around there no matter what you changed, that is why. Streamed content on AVP has commonly landed at 90 fps.
- On the M5 model, CloudXR streaming is reported to reach up to 120 fps for titles like iRacing. Treat 120 as a capability figure until you confirm it holds on your own rig and network; a rock-solid 90 to 100 is the honest expectation for most sessions.
The takeaway is the opposite of the flat-screen instinct. There is no prize for 200 fps here, because the headset will not show it. What matters is feeding the display a consistent frame at its refresh rate, every time. So cap the PC’s render sensibly (this config uses DesiredFPSLimit=120, at or above the display’s rate) and spend your effort on consistency, not peak numbers. That consistency work is the entire subject of the companion frametime guide.
Getting your network right
High-bitrate VR streaming is unforgiving of a weak link. In priority order:
- Wire the PC. Wired Ethernet from PC to the network node, Gigabit or faster, always.
- Put the headset on 5 GHz. Never 2.4 GHz, which lacks the throughput and is prone to interference. The Vision Pro is a Wi-Fi 6 (802.11ax) device, so 5 GHz is the fastest band it can use; it does not reach the 6 GHz band, which would need Wi-Fi 6E. A Wi-Fi 6E or Wi-Fi 7 access point still helps, not because the headset gets faster, but because you can move the rest of your household onto 6 GHz and leave the 5 GHz band cleaner for the stream.
- Give the headset its own SSID. A dedicated network pinned to 5 GHz, with nothing else joined to it, stops band steering (often called Smart Connect) from dragging the headset onto slower 2.4 GHz mid-session, and gives you one place to disable the settings that hurt this use case (multicast filtering, aggressive power-save) without touching the rest of your network. One honest caveat: a separate SSID isolates by name and by settings, not by airtime. If it shares a radio with your other networks, those devices still contend for the same channel, so real isolation still wants a dedicated access point, its own radio, or at least a clear channel.
- Do not stack up SSIDs to get there. Every SSID an access point broadcasts sends beacons several times a second, and that overhead consumes the same airtime you are trying to protect, so keep the total low: three or fewer is a good target, and staying under about five per radio is the usual advice. Consumer routers add two limits worth knowing. Many merge the bands under a single Smart Connect name, so you may have to turn that off (or use a band-locked guest network) to pin 5 GHz at all, and some cap how many SSIDs you can create. Check what yours allows before you plan around it.
- Keep the rig near the node. Walls and furniture badly degrade the high-frequency signal. Same room, clear line of sight, is ideal.
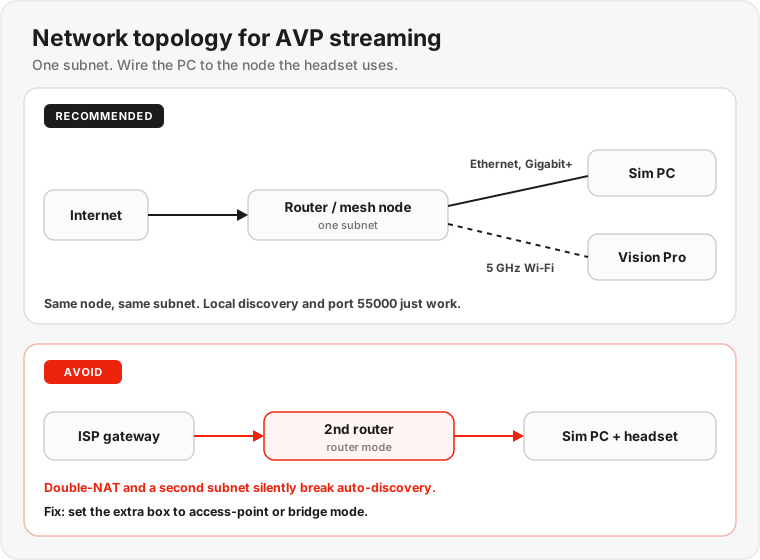
On the “dedicated hardware” question, be careful, because the common advice can backfire. iRacing’s own documentation suggests a dedicated router if your household saturates the network. The intent is right, but a second router dropped in behind your existing gateway usually creates double-NAT: two layers of address translation and a second subnet. For this use case that is worse than overkill. The headset finds your PC by local discovery and needs port 55000 open, and double-NAT or a split subnet is exactly the kind of thing that breaks discovery and pairing. You can spend an evening chasing a streaming problem you created.
Do it this way instead:
- If you have mesh hardware, dedicate a node to the rig and hardwire the PC into that same node (a wired backhaul to the mesh is ideal). The headset associates with that node over 5 GHz, the PC is wired to it, and both stay on one subnet. Shortest possible path, no double-NAT.
- If you are adding a standalone access point or a spare router, put it in access-point or bridge mode, not router mode, so it does not create a second NAT or subnet. Then wire the PC to it.
- Keep everything on one subnet. That is what lets local discovery and port 55000 just work.
The goal is not more boxes. It is a short, clean, single-subnet path with the PC wired to the same node the headset is talking to.
Calibration and comfort
The mixed-reality effect depends on the cameras cleanly seeing your hands on the wheel. During calibration you place your hands on the rim and rotate, and the headset locks in the position and drives automatic cockpit alignment.
What actually breaks it is contrast: the cameras have to pick your hands out against the wheel. iRacing’s official troubleshooting article names the specific culprits:
- Not enough ambient light. Give the room more light.
- Coverings on the hands. iRacing lists gloves, wristbands, and watches as things that impair tracking, because they cut the contrast the cameras rely on.
- High-contrast wheel elements. White grip tape in particular can be mistaken for your hands.
So on gloves specifically: the sure thing for a clean calibration is bare hands, and that is what iRacing’s own docs steer you toward. If you want to keep gloves, understand that the real problem is contrast, not gloves as such, so a pair that stands out strongly from your rim color is worth trying. Be honest with yourself that iRacing does not officially endorse this and it is unproven, so re-run calibration and confirm your hands line up before you trust it in a race.
For comfort and accuracy, set your physical seating position to approximate the virtual driver’s geometry, and use the Digital Crown to dial how much of your real room blends into the scene.
Troubleshooting the common issues
- Stutter, choppiness, or lag: Look at the network first, not the GPU. Confirm the PC is wired, the headset is on 5 GHz, and nothing else is saturating the connection.
- Headset can’t find the PC: Try a manual connection by IP first to confirm it is a discovery problem, not connectivity. Then work through: Windows network profile set to Private, port 55000 open, firewall rules allowing iRacingUI and cloudxrservice, no double-NAT between the PC and headset, and multicast filtering disabled on the headset’s SSID (the silent one on managed and mesh Wi-Fi).
- Tracking loses your hands: More ambient light, and raise the contrast between your hands and the wheel. Bare hands calibrate most reliably; if you wear gloves, try a pair that contrasts with your rim, and reconsider white grip tape.
The bottom line
iRacing on Apple Vision Pro is not a casual plug-and-play headset experience. It’s a streaming pipeline that rewards a capable PC, a genuinely strong network, and a few deliberate settings. Get those right and the payoff is real: a high-fidelity cockpit with your own hands on your own wheel, which no other VR sim racing setup delivers in quite the same way.
Start with the essentials that move the needle most: wire your PC to the node, put the headset on 5 GHz, and turn on foveated rendering. Understand that on AVP the gaze-following happens in the stream, not the sim, so tune the fixed inset accordingly. Everything else is refinement from there, and refinement, one careful change at a time, is exactly how you build a setup you can trust on race day.
Chasing consistency across every display you race on, flat screen, triples, or VR? That is the focus of our companion guide, frametime consistency in iRacing.